Pages

Saturday 21 April 2012

Newborn knitted socks free pattern

Newborn cocks

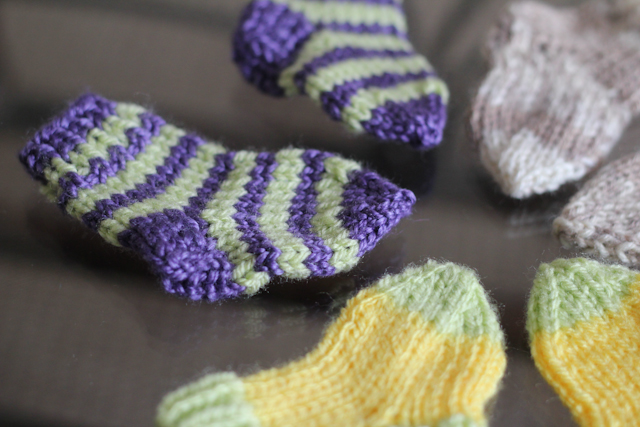
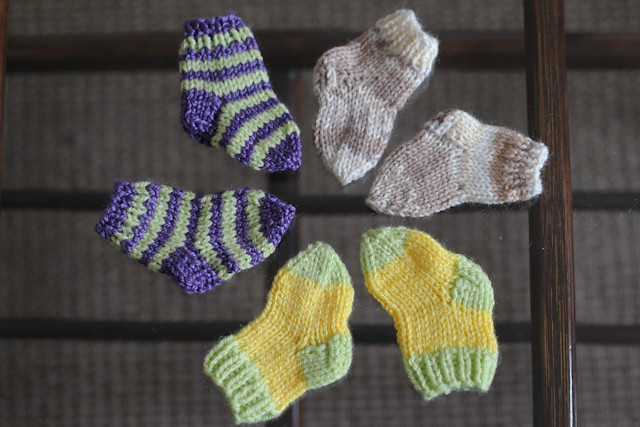
As my little nephew is freezing in Manchester (it's only +16 in their appartment, and even less during the night) I just thaught it would be right to make him some little socks. So, I'm not only making them, but sharing a free pattern with you too!

Newborn sock set

Ok, let's start.
First of all, we'll need some DK yarn leftowers. I really mean some scraps, because for such a tiny project you don't need much of yarn. So it's ideal for using some bits from your bigger projects.
Then we'll need a set of 2.5mm double pinted needles.

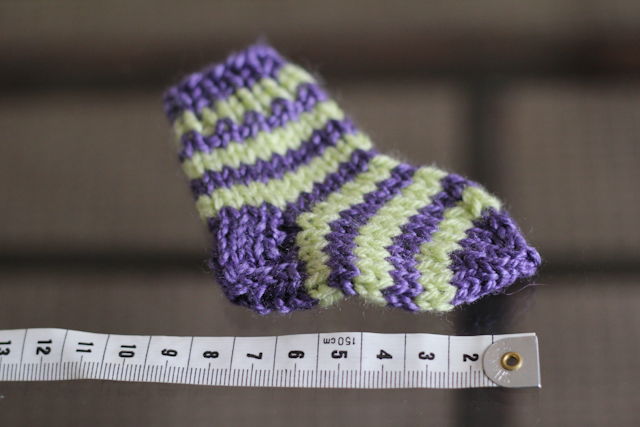
My gauge was: 10st x 10 rows = 4.5 x 3 cm.

Cast on 20 stiches and divide them between 4 needles. There will be 5 st on each needle then. We'll work in rounds starting with the 1x1 rib.
Round 1: *k1, p1*, repeat 9 more times from * to *.
Rounds 2 - 5: repeat round 1
Round 6: knit
Round 7 - 12: repeat row 6
then work only on first and second needles, which means - with 10 st. Take them to one needle and work in rows.
Row 13: knit
Row 14: purl
Row 15 - 18: repeat row 13-14 two more times.
Row 19: knit 6, k2tog, turn
Row 20: take the first st off to the working needle (don't purl it!), purl 2, p2tog, turn
Row 21: take the first st off to the working needle (don't knit it!), knit 2, k2tog, turn
Row 22: take the first st off to the working needle (don't purl it!), purl 2, p2tog, turn
Row 23: take the first st off to the working needle (don't knit it!), knit 2, k2tog, turn
Row 24: take the first st off to the working needle (don't purl it!), purl 2, p2tog, turn
And you'we done the heel!
Knit that 4 st from the top of the heel, then cast on 4st along the side of the heel, knit the stiches from 3rd and 4th needle, cast on 4 st along the other side of the heel. Now you should divide stiches as following: 6 st on the 1st needle (4 from the side of the heel and 2 from top of the heel), 6 st on the second (the same as on the first one), 5 st on the 3rd, 5 st on the 4th. After dividing the sts on the needles and knitting the last two sts on the first needle your yarn will be between the first and the second needle. Start knitting from the second needle:
Knit 4, k2tog on the 2nd needle, knit all the sts from the 3rd and 4th needles.
In the next round k2tog in the beginning of the first needle and knit all the sts from 2nd, 3rd and 4th needle. So you get 5 st on each needle.
Knit 11 more rounds.
Then you need to start decreasing to form the toes. K2tog in the beginning and the end of each needle. You will get 3st on each needle after making this row. Knit the next row with no decreases.
In the next row knit together every 2 st. You will have 6 st left after making this row. Cut the yarn leaving 15cm long tail. Using the tapestry needle sew the last sts together and hide the yarn ends.
Repeat for the second sock!
 
Newborn stripy socks

This is a quick and fun project to make! Give it a try and in an evening you could make a couple of pairs for those little feet of your baby (nephew, grandchild, some friend's baby). It is so addictive that after the first pair it is really difficult to stop and you might find yourself choosing the colours for the next pair when the first pair is not even finished.
Any comments about the pattern would be highly appreciated as this is my first sock pattern and I'm not English native speaker. But I still hope it's clear enough and you all could have a lot of fun with it :)
And if you make a pair I really would love to see the pictures of your little socks too! 

Monday 16 April 2012

Treasury box for baby Leon

Last week was awesome - I was working on some new crocheted stuff, started one knitting project and, the most important news, our family became bigger - in the 11th of April my husband's cousin had his little son, baby Leon in Manchester hospital. Now they are both home - mum Mary and her little baby, they feal fine and are getting to know each other better.
As in the last couple of months I was knitting and crocheting some little baby stuff for baby Leon, when he was finaly born I've collected all of it, put it into a beautiful box and posted to Manchester.

IMG_2030

And this is what was in the box:
a newborn size baby cardigan. It's my own design, but I didn't write down the pattern.

IMG_2020

A crocheted baby cardigan for 3 months olds. I used the the pattern from Virkipa, you can find the pattern in this post. It is wonderfully soft and I used the buttons in four different colours so it would look more interesting.

IMG_2018

a baby blanket. You can find the pattern in a previous post.

IMG_1975

and a little 100% cotton baby rattle.

IMG_2028

The next day I had a phone call from Mary and she told she liked it all so much and it looked so sweet and lovely! That's great when someone really likes what you are doing, isn't it?
I hope baby Leon will enjoy all of his gifts.
And I've noticed that I haven't been posting any pictures of My Little Man for a while. Here he is, my little angel:

IMG_2035

He's doing great, rolling around, playing with toys and yesturday had his first two teeth - lower front ones :)

Tuesday 10 April 2012

Crochet baby ripple blanket free pattern

IMG_1975

Size 77x79 cm
You will need 250g. of DK, 150g in yellow and 100g in blue, 4mm crochet hook and a bit of patience.
This pattern is super easy, all you need to know before starting this blaknet is how to make a double crochet and how to crochet two double crochet together; the tricky part is the first row where you need to count the dc. All the rest is easy.
Some abbreviations I used:
ch is chain
dc is a double crochet
2 dc into next dc means make two double crochets into the next double crochet of a previous row (increase)
dc 2 tog means double crochet two together (decrease)
I would adwise you to make a gauge from the yarn you want to use in the blanket. For the gauge chain 18, dc into the 3rd chain from the hook, dc into next 5 chains, make 2 dc into the next chain, make 2 dc into the next chain, dc into next 5 chains, dc 2 tog, turn. For the second row chain two, dc into next 6 chains, make 2 dc into the next chain, make 2 dc into the next chain, dc into next 5 chains, dc 2 tog, turn. Repeat the second row a couple more times. This is how ONE of your blanket ripple "waves" will look. 9 of them will make this partikular blanket. By making it you can understand how big your blanket will be.

If you want to make you blanket wider simply change the number of times you crochet from * to * (point 6 of row 1) and repeat it every row.

IMG_1968

So, are you ready to start? Here we go:
Row 1:1.) take your yellow DK and chain 146 with it,
2.) dc into the fourth chain from the hook,
3.) dc in next 5 chains,
4.) 2 dc into the next chain
5.) *2 dc into the next chain, dc in next 5 chains, dc 2 tog, dc 2 tog, dc in next 5 chains, 2 dc into the next chain*
6.) repeat from *to* 8 times
7.) 2 dc into the next chain, dc in next 5 chains, dc 2 tog
Row 2:chain 2, dc in next 6 dc, 2 dc into the next dc, * 2 dc into the next dc, dc in next 5 dc, dc 2 tog, dc 2 tog, dc in next 5 dc, 2 dc into the next dc*, repeat from * to * 8 times; 2 dc into nxe next dc, dc in next 5 dc, dc 2 tog.

And here is the drawing to show you the first two rows. I know it could have been better and I'll try harder next time, but for now I hope it's all more or less clear:

IMG_2015

Repeating row 2 make two more rows in yellow, than change the colours as follows:
2 rows blue,
1 row yellow,
3 rows blue,
2 yellow,
1 row blue,
3 rows yellow,
2 rows blue,
1 row yellow,
1 row blue,
2 rows yellow,
3 rows blue,
4 rows yellow,
2 rows blue,
3 rows yellow,
1 row blue,
1 row yellow,
2 rows blue,
3 rows yellow,
1 row blue,
2 rows yellow,
3 rows blue,
4 rows yellow,
1 row blue,
1 row yellow,
2 rows blue,
3 rows yellow,
1 row blue,
2 rows yellow,
2 rows blue,
5 rows yellow.

If you want to make the blanket longer, skip last 2 rows blue and 5 rows yellow, and repeat from the top - 2 blue, 1 yellow, 3 blue and so on till you are satisfied with the lenght. Then, after finishing your last rows in blue, make 5 rows in yellow to finish the blanket. In this case you obviously will need more yarn in both colours.
Hide the yarn ends and enjoy your new baby blanket :)

If you make a blanket with this pattern I would be really happy to see you results, so any pictures or links to them are appreciated in comments. As well as any questions. Just ask and I will be glad to help.

Saturday 7 April 2012

Finishing touches

As a while ago I was working on a bunny who was in fact my first custom order for a crocheted toy I started thinking of giving it more professional look and decided it needed a lable.
Than I had to decide what to put on a lable and how that lable should look. I didn't really want to sew the lable to bunnies body, so I came up with the idea to use something like paper tags. Of course it had to contain some washing instructions, some info of who made the toy and some kind of a logo.
Washing instructions were the easiest as you can find it on yarn lables. But name and logo took me quite a long time. I wanted something easy to remember, something sweet (but not too sweet), something connected with babies and toys. I asked some of my friends and relatives with no result really. And then suddenly it just came to me, just appeared in my head - I love bunnies, I make bunnies and I am a mother which inspires me to make the toys. So who else I am if not A Bunny Mama?
Then I spent some time thinking about the logo. Does it have to be a bunny? A painting, a drawing, a stamp? And then again it just appeared in my head - sweet, handmade, crocheted, bright - a cotton crocheted flower! It just tells everything I want to tell - the material, the colour, the way I work.
And so the lable was born:

IMG_1914

IMG_1916

And this is how the finished toy with a lable looked like before I put it into a box to go to the Post Office:
IMG_1919

Now every toy I make will have it's ovn lable with a crocheted flower and washing instructions on the back.

What do you think? Do you like it?

Wednesday 4 April 2012

Baby cardigans in the Web - so many awesome free patterns!


Recently I made a bit of Internet research looking for some nice crocheted baby jackets and pullowers. As I found some good free stuff and I might need it all in the future I've decided to make a post with all of them in one place:

1. Found it the blog of Creative Jewish Mom, but the original pattern is made by Julie Holetz and can be found here. But I should confess I like the colours and finishing touches by Creative Jewish Mom better. It just looks more elegant this way I think.
2. Hehagon granny baby jacket. The description, made by Tina can be found in her pattern blog and is a newborn size. Bigger size (3-6 months) version made by Bev can be found here and I took the picture from Bev's page aswell. To me this one looks more girlish than boyish, but still a good and simple idea, besides if instead of using a lacy granny square stile we would use a solid granny it would look different... Just use your imagination.
3. Baby hooded cardigan with a zipper. Well, this one definetly looks boyish. But again - a bit of imagination, different colour, some embelishement like crocheted flowers or embroidery and it would look girlish enough.
Two sizes - 6 and 12-18 months, which is good.
The only thing that scares me is that zipper. Have no experience in puting a zipper in crocheted or knitted garmets...


4. Baby sweater that could be a unisex sort of garmet. I will definetly try to make one like this for My Little Man for the autumn as the sizes are 6, 12, 18, and 24 months and 12 months is exactly what we need.


5. Striped Baby Sweater. This one could be made for girl or boy just by changing the colour as the pattern is unisex aswell and size range is as for the previous sweater. This one is in my To-do list for autumn too.


6. And the last but not least - my favorite design this time, a baby cardigan made by Virkipa in her swedish blog. Good news is - she has english version too, you just need to scroll down the page to find it. And it's so simple that after finishing your first one you will want to start the second. Believe me, I know. Because that's what I did :)
In the next couple of days I will show you at least one finished baby cardigan or even two if I will finish the second quickly.

gone crocheting


I know, I haven't been here for a while. But it doesn't mean I didn't do anything good.
First of all - I recieved my first checque for my crocheted design pattern, Snowman family. Now they are available as one pattern in Knitter's World Scarborough. And I should confess it makes me feel extremely good as now I know for shure that things I do are interesting and important for someone.
The next great thing was two orders for my bunnies.
This way Mr Big Bunny Brother got a blue eyed twin:

IMG_1889

IMG_1887

IMG_1884

IMG_1883

The lady I made it fore asked for blue eyes as the blue eyes of her little son. Isn't it lovely? Today the bunny allready met his new family in London and they wrote me back that they really liked him :) So I'm happy-happy-happy!

The other bunny is for another lovely lady and her baby. I'm planning to give it to her tomorrow and hope she likes it too. Now I'm still working on him:

IMG_1891

Plus I was finishing some gifts for our cousin's baby, who is expected on the 8th of April. The pictures will follow.